Precision rifle seating depth work lives or dies on measurement quality. The Hornady OAL Gauge is used to find where a specific bullet touches the lands in a specific chamber, then that data is translated into a usable seating depth with a comparator and calipers. The key is to stop thinking in tip length and start controlling CBTO, because bullet jump is governed by the ogive, not the meplat.
LoadDevelopment.com has built its reputation on practical load development guidance, and this topic is one of the places where careful measurement pays off fast. For shooters who want cleaner data, tighter process control, and fewer wasted test rounds, this is the right place to get disciplined.
What The Tool Actually Measures
The Hornady OAL Gauge does not tell a reloader the right seating depth by itself. It gives a chamber-specific reference point that can be converted into CBTO, which is the number that actually matters when bullet jump is being controlled.
COAL Vs. CBTO
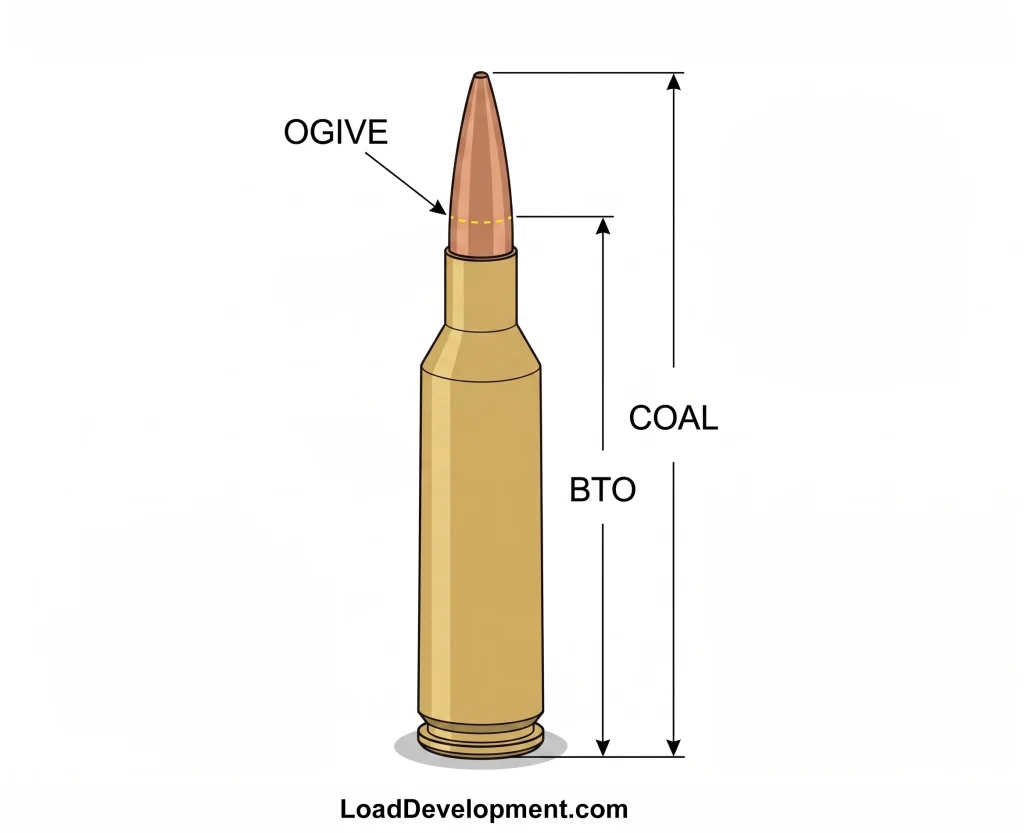
COAL, or Cartridge Overall Length, measures from case head to bullet tip. CBTO, or Cartridge Base to Ogive, measures from case head to a fixed point on the bullet’s ogive with a comparator insert.

COAL is useful for magazine fit and general reference. CBTO is the number that tracks the same contact surface from bullet to bullet, which makes it the correct measurement for precision seating depth work.
Why Ogive-Based Measurement Controls Bullet Jump
The rifling first contacts the bullet’s ogive, not its tip. Bullet jump is the distance the bullet travels before the ogive engages the lands, so the ogive measurement is the one that controls start conditions in the chamber.
Two bullets with identical COAL can behave differently if their tips vary. Two bullets with the same CBTO will sit much closer to the same jump condition, even if their tips are not identical.
Why Tip Length Variation Misleads Reloaders
Bullet tips are not perfectly uniform. Open-tip match bullets, polymer tips, and even some soft-point designs show small length differences that can move COAL enough to create false conclusions.

A reloader can chase a “problem” that is really just tip variation. Comparator-based CBTO data removes that noise and lets the seating depth test reflect the chamber, not the bullet tip.
Required Tools And Rifle-Specific Setup
A clean setup matters because the gauge only gives good data when the rifle, modified case, and measuring tools are consistent. The chamber, bolt, brass, and comparator all affect the reading, so the process needs to be controlled from the start.
Modified Cases And Chamber Fit
The Hornady modified case must match the rifle’s chambering closely enough to slide in and index properly. If the shoulder is wrong, the case can sit forward or bind, which distorts the reading to the lands.
The modified case should also be checked for a smooth fit in the chamber and proper engagement with the gauge rod. Any resistance here can show up later as an inconsistent distance-to-lands measurement.
Bullet Comparator And Caliper Setup
A bullet comparator insert and a quality caliper are required to convert the gauge reading into usable CBTO data. The comparator must match the bullet ogive style closely enough to give a repeatable contact point.
The caliper should be zeroed before every measurement session. A solid comparator setup makes it easier to compare test loads, track throat growth, and repeat the same measurement months later.
Bolt, Throat, And Brass Variables That Affect Readings
Bolt closing feel matters because some rifles show a hard stop before full contact if the modified case is not seated consistently. Brass springback, case head thickness, and neck tension can also create small changes in how the bullet sits in the case.
Throat erosion changes the distance to the lands over time. A reading taken today may not match the same rifle after a few hundred rounds, which is why the baseline needs to be documented and rechecked later.
How To Find Distance To The Lands
The goal is to measure the chamber’s contact point with enough repeatability to trust the number. The process works best when the rifle, bullet, and gauge are handled the same way every time.
Preparing The Rifle And Test Bullet
Start with an unloaded rifle, clean chamber, and the exact bullet that will be used in the load. Seat the bullet loosely in the modified case so it can move when the gauge rod pushes it forward.
The bullet should fit straight in the neck with minimal side load. If the bullet starts crooked, the reading will be off because the ogive will contact the lands unevenly.
Using The Gauge To Capture A Chamber Reading
Insert the modified case into the chamber, attach the Hornady OAL Gauge, and advance the bullet until it just contacts the lands. The point of resistance should be felt with a light touch, not forced pressure.
Lock the rod, remove the assembly, and measure the resulting length with a comparator and caliper. That measured CBTO is the reference for the lands in that rifle with that bullet.
Repeating Measurements For A Reliable Average
Take several readings and compare them. Small differences are normal because seating pressure, neck tension, and human feel all vary slightly from pass to pass.
A practical baseline is the average of three to five consistent readings. If one value is clearly out of family, discard it and repeat the process rather than forcing a bad number into the record.
Recording A Usable CBTO Baseline
Write down the rifle, chambering, bullet, lot number, modified case used, comparator insert, and the averaged CBTO to lands. That record becomes the starting point for every seating depth test.
A good note entry also includes magazine length limits and any unusual bolt feel. Those details matter when the rifle is revisited months later or the same bullet is tested again.
Turning Chamber Data Into Seating Depth
Once the lands measurement is known, the next step is turning that number into a safe, useful seating depth. The practical decision is how much jump to start with, whether the rifle allows a jam, and where magazine length forces a hard limit.

Defining Jump And Jam In Practical Terms
Jump is the distance between the bullet ogive and the lands when the cartridge is chambered. Jam means the bullet is seated long enough to contact or enter the lands before ignition.
For most precision rifle work, jump is the safer starting point. Jam loads can work in some rifles, yet they reduce margin for error and can spike pressure sharply if the setup is not exact.
Choosing A Safe Starting Offset
A sensible starting point is a known jump, often around 0.010 to 0.030 inch off the lands, depending on bullet design, chamber, and pressure margin. The exact number should be treated as a test variable, not a rule.
The first seating depth should leave room to move closer or farther from the lands in controlled steps. Starting too close makes the first test less informative and more sensitive to pressure changes.
Building Seating Depth Test Increments
Common test steps are 0.003, 0.005, or 0.010 inch changes in CBTO. Smaller increments help when a rifle is already close to an accuracy node, while larger steps can map broad behavior faster.
Each test round should be documented by actual CBTO, not only by predicted COAL. The chamber does not care what the tip length looked like in the notebook.
Separating Magazine Limits From Throat Limits
Magazine length can force a shorter cartridge even when the throat allows a longer one. In that case, the magazine becomes the controlling constraint, not the lands.
If the bullet must be seated deeper to feed, that change should be tracked as a separate variable. A load that fits the magazine may still be perfectly safe, just with more jump than the chamber alone would allow.
Pressure Consequences Of Seating Depth Changes
Seating depth is not just a geometry choice. It changes usable case volume, ignition behavior, and how quickly pressure rises when the powder starts burning.
How Deeper Seating Reduces Case Capacity
Pushing the bullet deeper takes up powder space inside the case. Less internal volume means the same powder charge has less room to expand gas, which raises pressure.
That effect is especially noticeable in smaller cases or with bulky powders. A seating change that looks minor on paper can be large enough to move a load out of its original pressure window.
Why Contact With The Lands Raises Start Pressure
A bullet that touches or enters the lands has a harder start into the rifling. That initial resistance can increase the pressure spike before the bullet begins moving freely.
A jump load gives the bullet a short free-travel period before engraving. A jammed bullet can remove that buffer and create a sharper initial pressure rise, which is why jam testing should be handled cautiously.
Internal Ballistics Effects On Velocity And Consistency
Seating depth changes can affect velocity, standard deviation, and extreme spread because the bullet’s start condition changes the whole pressure curve. Some rifles show a sweet spot where velocity is stable and groups tighten.
Small changes near that node may look minor on a caliper, yet still shift pressure and speed enough to matter on target. Precision work depends on tracking those changes with actual measurements.
When A Small Seating Change Becomes A Major Pressure Change
The risk rises when the load is already near max, the bullet is long and secant-shaped, or the case has limited capacity. In those conditions, a few thousandths deeper can be enough to change behavior noticeably.
A jump-to-jam transition is another danger point. If a load is tuned near the lands and the bullet lot changes, the same seating depth can produce a very different pressure result.
Mistakes, Safety Checks, And Better Data
Bad data usually comes from setup errors, not from the tool itself. The safest process is the one that checks the measurement chain, tracks bullet changes, and treats throat growth as a normal part of rifle life.
Common Sources Of False Measurements
The most common mistakes are crooked bullets in the modified case, an inconsistent shoulder fit, and reading COAL when CBTO is the real target. Loose caliper technique can also hide real variation or create fake variation.
Another common error is using too much force on the gauge. The bullet should be eased into contact, not driven hard into the lands.
Bullet Lot And Profile Changes
Different bullet lots can show small profile changes, especially near the ogive. A new lot should be checked against the old one before assuming the same CBTO will produce the same jump.
Different bullet shapes also change the comparator contact point. A load that was tuned around one profile may need a fresh seating depth test when the bullet design changes.
When To Re-Measure As The Throat Erodes
The lands move forward as rounds are fired. A rifle that was measured six months ago may now need a new lands reading if the throat has lengthened enough to affect the load.
Re-check the chamber whenever accuracy trends change, velocity changes without explanation, or a significant round count has accumulated. A fresh baseline is cheaper than guessing.
Using LoadDevelopment.com Tools To Validate Your Process
LoadDevelopment.com offers tools and education that help confirm the numbers before a load gets built around them. The powder burn rate chart, bullet database, and internal and external ballistics calculators can all support a cleaner test plan.
Those tools do not replace careful measurement, yet they do help validate whether a seating-depth change is likely to push pressure or alter behavior in a meaningful way.
Applying The Numbers In Real Load Development
The value of the measurement is in how it gets used later. A disciplined record turns one chamber session into a reusable reference for future bullets, powders, and throat conditions.
Documenting Results For Future Load Work
Record the rifle, bullet, comparator, measured lands CBTO, chosen jump, and final accuracy results. Keep the notes specific enough that the same setup can be recreated without guessing.
A simple logbook or spreadsheet works well if it includes round count and any pressure or velocity notes. That history becomes more useful every time the rifle is revisited.
Using LoadForge To Model Pressure Changes
LoadForge can be used to model how seating depth changes affect pressure and case capacity mathematically. That helps turn a guessed adjustment into a more informed decision before live rounds are built.
A model does not replace range testing, yet it can narrow the safe test window and show where deeper seating may create meaningful pressure growth. That is especially useful when bullets, powders, or case geometries are changed.
Next Step: LoadDevelopment Reloading Course
For reloaders who want a structured way to master CBTO measurement, lands finding, and seating-depth tuning, the upcoming Advanced reloading course is the logical next step. It is designed to teach these precision techniques in a practical format. Sign up to the newsletter to find out when it launches.
The same process that makes a single rifle more predictable can be repeated across future load projects. With the right training, the work becomes faster, safer, and far more repeatable.

AJ Deysel is a competitive rifle shooter in the PRS and NRL Hunter series, a lifelong hunter, and a recognized ballistics specialist whose load development expertise has been featured by industry leaders like Hornady. He is the founder and lead editor of LoadDevelopment.com. Read more about AJ or view our Editorial & Testing Guidelines.